
Dragon Slayer – Shortfilm
Dragonslayer is a 3D animated fantasy short film of 8 min. length. The Project was completed during a period of 24 months. It took about 9 months of preproduction, 12 months of production and 3 months of postproduction..
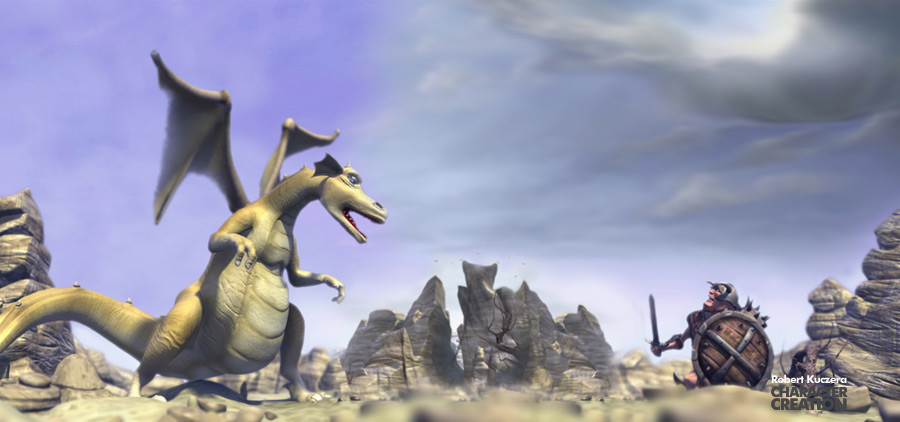
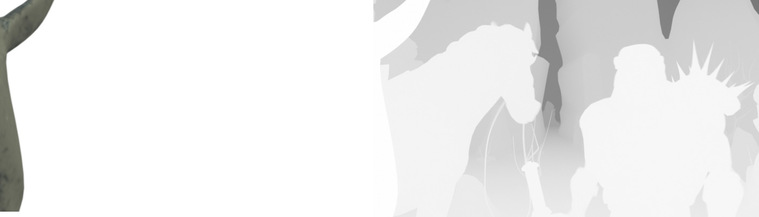
In a time when dragons threatened mankind, there was only one man who fought against them all. His name is Tarragon and riding on his brave battle horse Black Bull he is on his way to work. But things don’t always turn out as they should… one day …mhh…
About
How did I come up with the idea for Dragon Slayer and what inspired me?
A friend of mine came up with a grain of an idea about a dragon slayer who was confronted with a baby dragon. This picture was so strong, that we decided to work on it, It took us over a year to get a final version of the story.
From there on we developed a lot of different versions of the story. And this was the time when I found out, that it takes a long time to get a good result on a story. Even in the production we changed and added things.
So I think finding a good story is one of the most difficult parts in making a movie. Leon the professional has a similar story and basic idea. Also the situation of many people I know inspired me. They do a job because they have to do it. They never took enough time to find out if their job was the right one or if it makes them happy. Is it really what they want to do for the rest of their life? You spend half your day working… That’s a lot of time. Often it takes an unexpected, outstanding event which gives someone the chance to change.
What I hope people will take along from the movie, Think about your life, about your job. Do you make the right decisions? Or is it just the easiest way to go?
Our character
The main character, the dragon slayer, faces a situation in which he has to decide either to fulfill his job or follow his heart. He leaves his old life and routine job behind him and moves on to his dream job. He becomes a forger. He also takes responsibility for what he did, killing a mother dragon, and raises a couple of baby dragons.What will he tell the baby dragons when they get older? Where do they come from, where is their real mother?
Inspiration of the characters
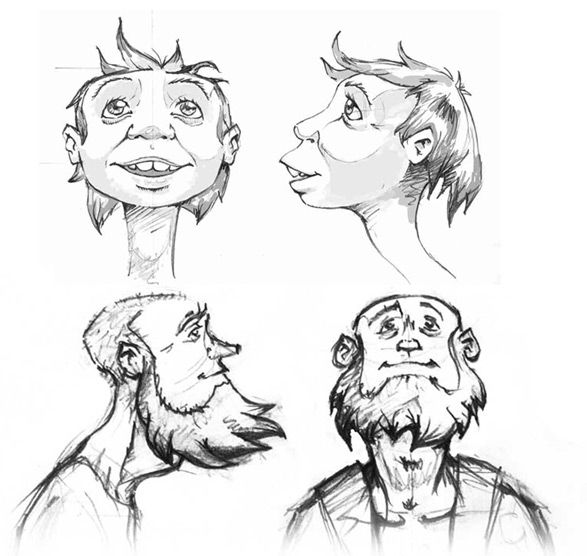
The characters are designed by Michael Sieber and Klaus Morschhauser . In my eyes the hero looks a bit like the gladiators from Asterix and Obelix. The dragon looks a bit like the dragon from Shrek.
Finding the Story
What specifically did I try to achieve with the story of Dragon Slayer?
Dragon Slayer is a short film which shows the situation of many people. A lot of people do their job without passion. They don’t take the time to find out, if the job they are doing is he right one and gives them enough satisfaction. At the end you work the most time in your life. Maybe there is another job you always wanted to do?
If people begin to think about there life and try to change it, it always has something to do with a key moment in life. Something has to happen that makes them change. This is what happens in our story. But it’s not only about the right job, it’s also about a life task. This can be different for everyone. Someone takes care for other people, others raise children… What do we expect from life?
In the end, this is a story about the change of a character. The professional dragon slayer admits to himself what his dream job really is – a blacksmith. By doing so he also raises a little child. But he also has to suffer for what he did. Raising a little child is not so easy, there is a lot he has to learn. How do you treat a pubescent? What will our hero tell him when he grows up and where he comes from?
Development of the story
There were a lot of different versions of the story ( 5 different versions of the story fixed in treatments and screenplays.). I learned, that it takes a long time to get a good result. At the end it took us about 9 months to find the final story. Even during production we change and added things to the story. So I think finding a good story is one of the most difficult parts in making a good movie.
Animatic
There are 5 different versions of the animatic. Four 3D Animatics and one life action animatic.
Every time we finished one Screenplay, we thought „this is the story“. We passed the storyboard and got straight to the animatic.
But after watching the animatic we realized that this was not the final version of the movie.
The good thing about the animatic was that you get a very good feeling for the story. Whereas it is much more difficult to judge the story by just watching the storyboard.
It was a lot of work making the animatics over and over again, but your well-advised putting a lot of energy in the storyboard and the animatic at the beginning of a production, otherwise you will waste a lot of time when you find out somethings wrong with the story.
What I learned from this, next time I will definitely start with a storyboard and get assistance from an experienced person fot the shot break-up
Team
What sort of a team did I have to assist with the production of Dragon Slayer, and how long did it take from concept to completion?
For the most part I was working alone on the film. Over the whole period there were always some other people helping with something for a short time. They helped my out on some stuff like modeling, texturing, rigging, and compositing. Others did more specialized things, such as cloth simulation,, preparing the rain using particles, or making fire. This was very helpful, because I wasn’t very familiar with particles like rain and fire, and dynamics like cloth.
Then there had to be some specialists, who did the music, sound design and color correction. These were fields I was not familiar with at all.
The first version of the story was developed without the help of a screen writer. This was not a good idea, because of my inexperience in developing a story this process was very time consuming. This changed immediately after I started to work with the screnn writer Philip Koblmiller. He exactly knew how to structure the story. Which saved us a lot of time. Apart from that it helped focusing on the actual story.
For the storyboard I worked together with Gerd Schneider. He is an experienced story boarder with dramaturgic skills. Which was very helpful for the project.
The project was completed in a 24-month period consisting of 9 months in preproduction, 12 months in production and 3 months in postproduction
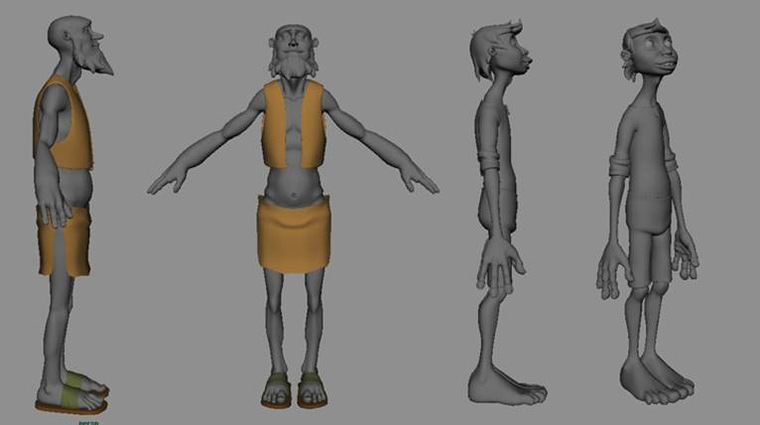
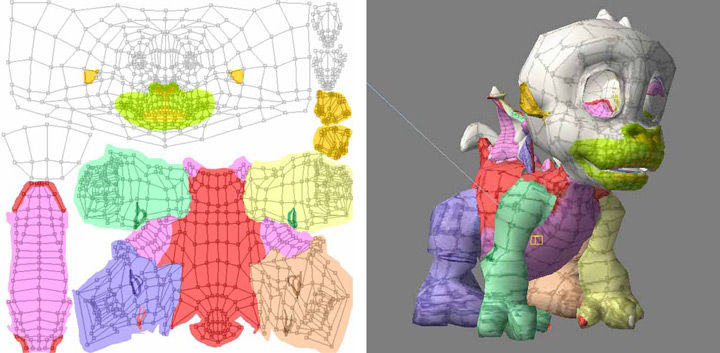
Character Designs
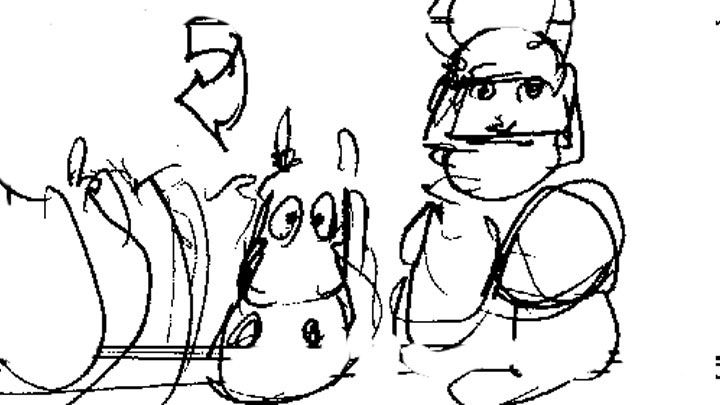
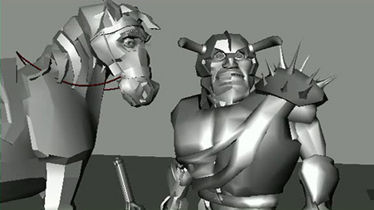
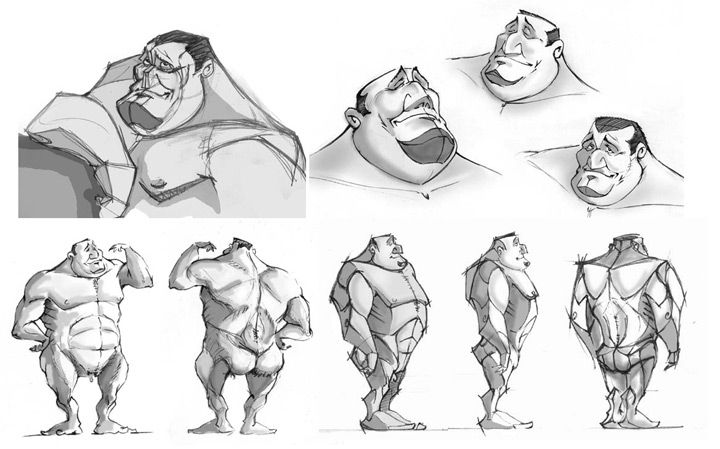
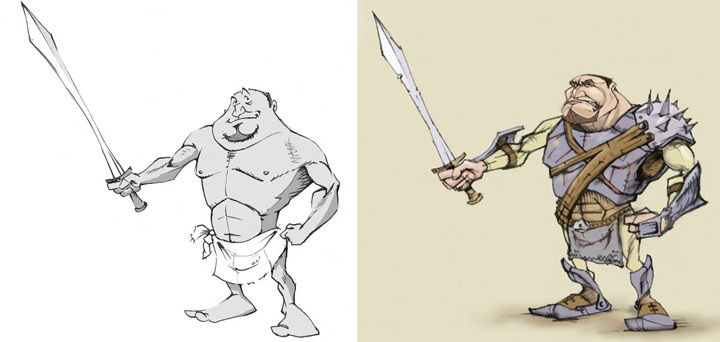
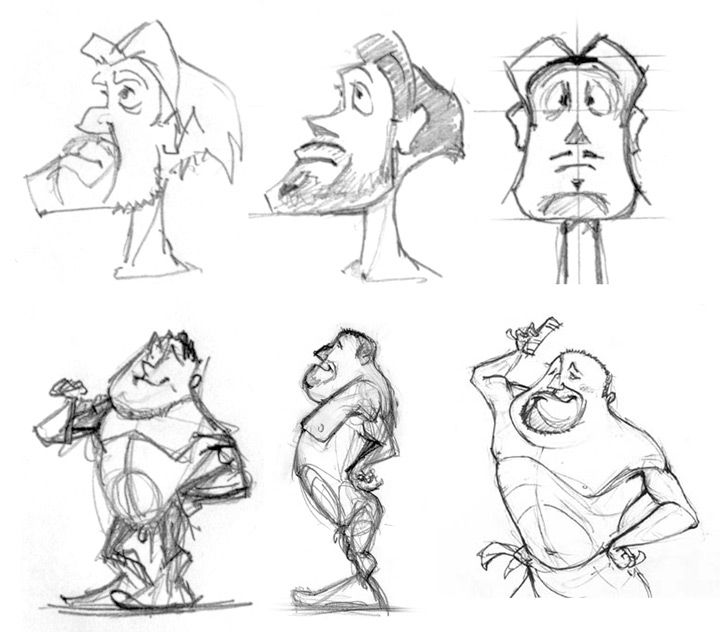
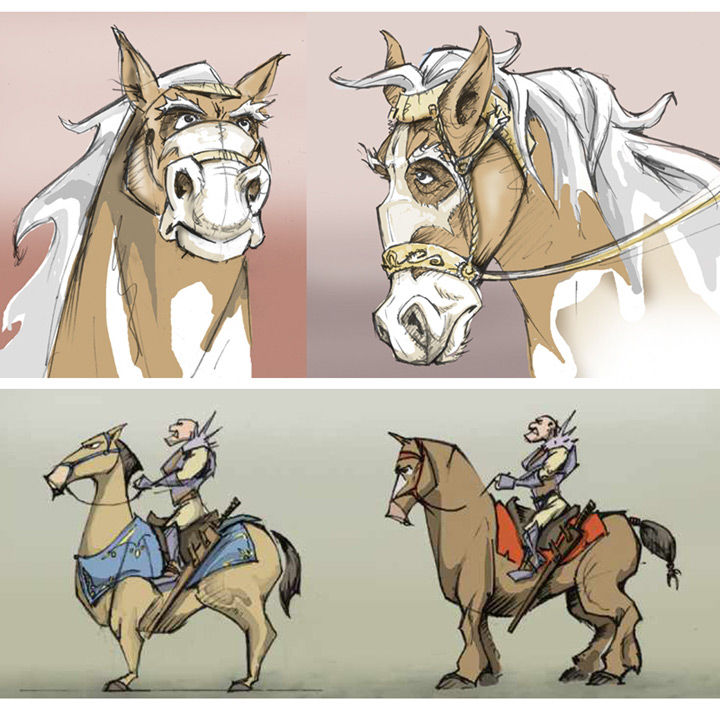
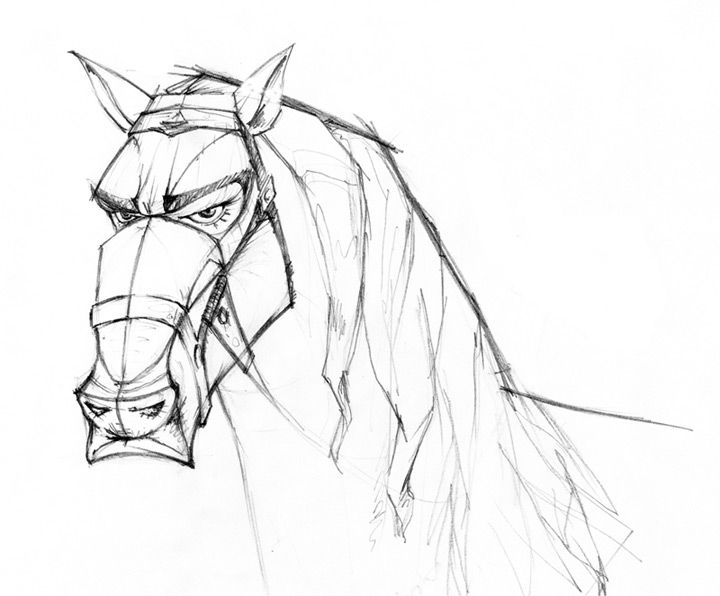
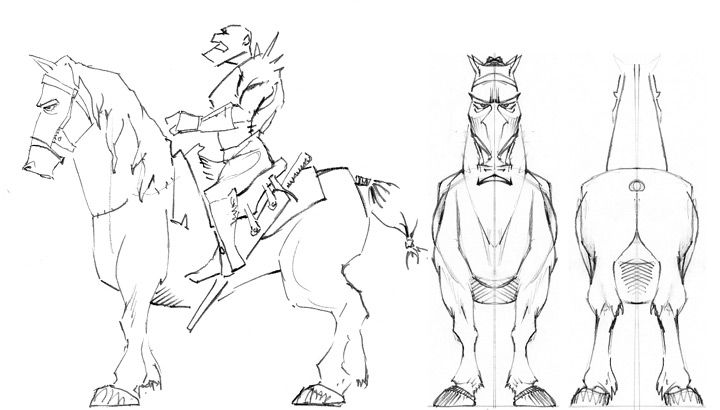
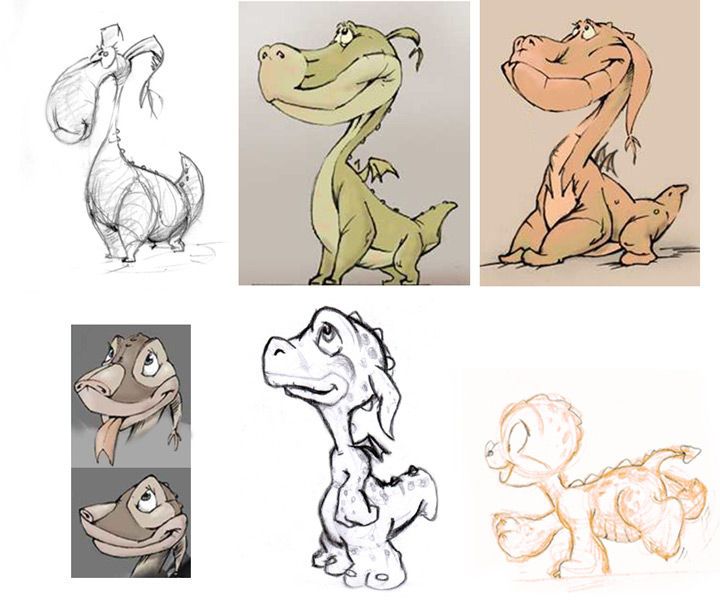
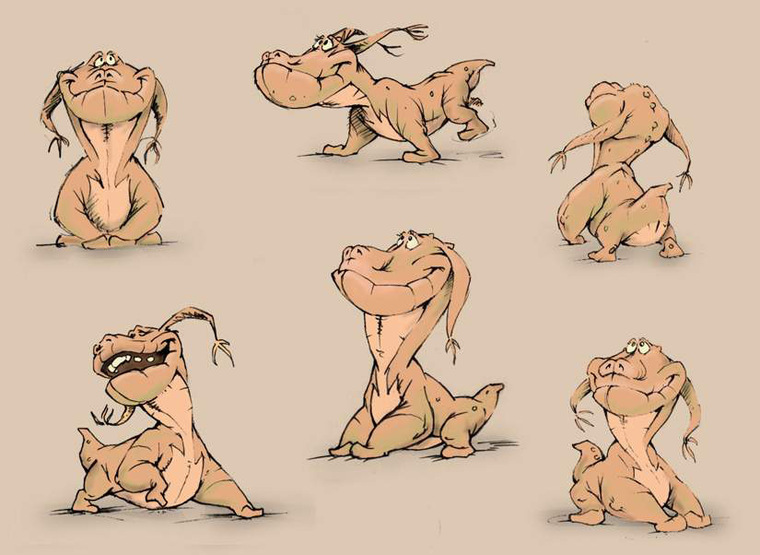
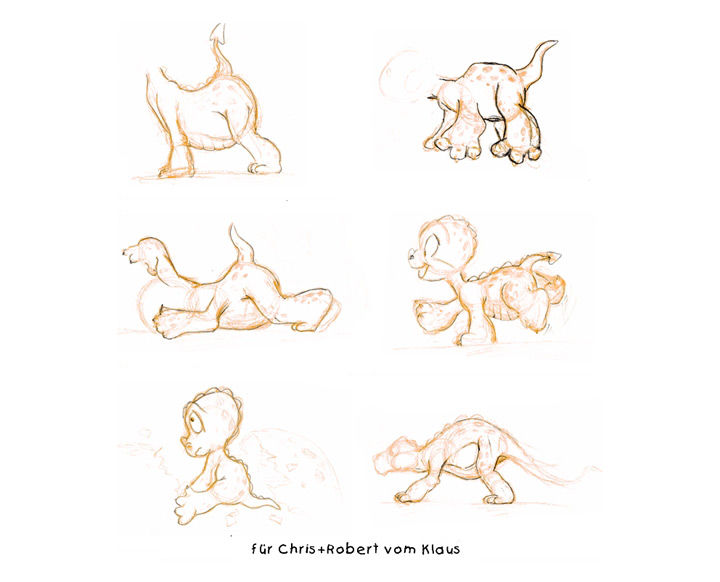
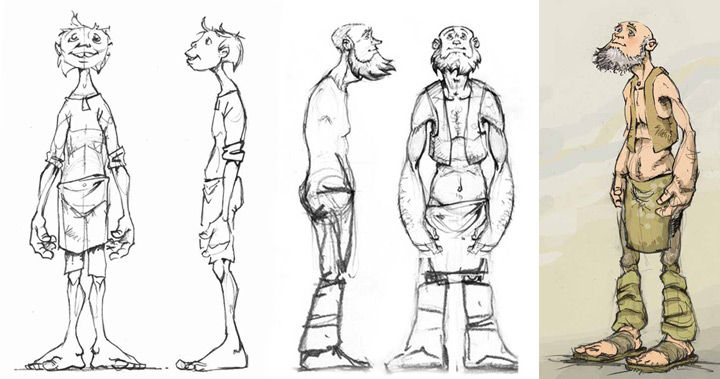
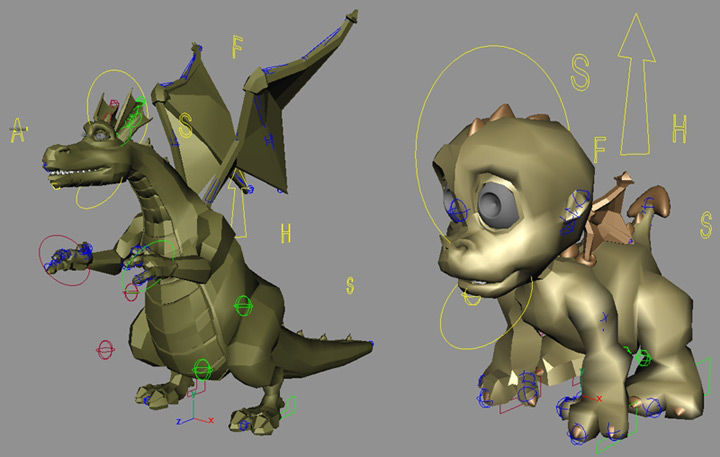
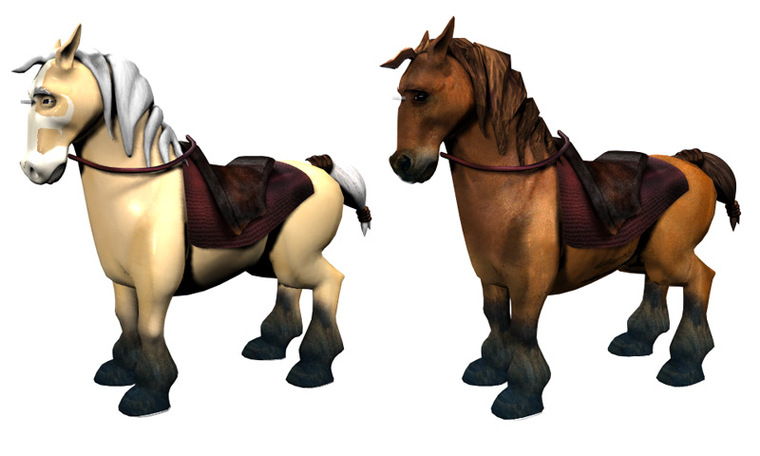
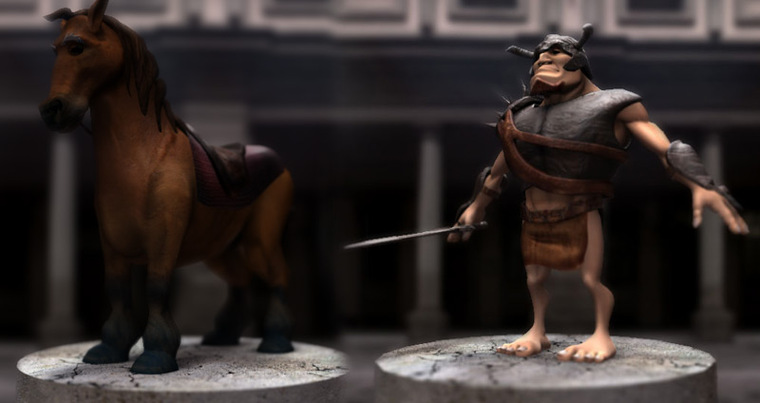
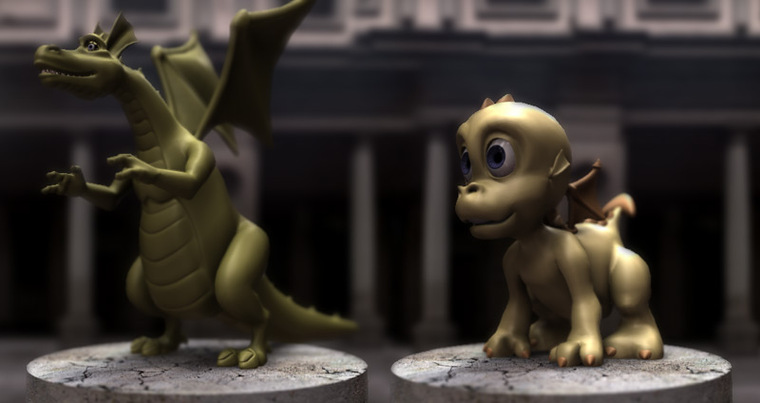
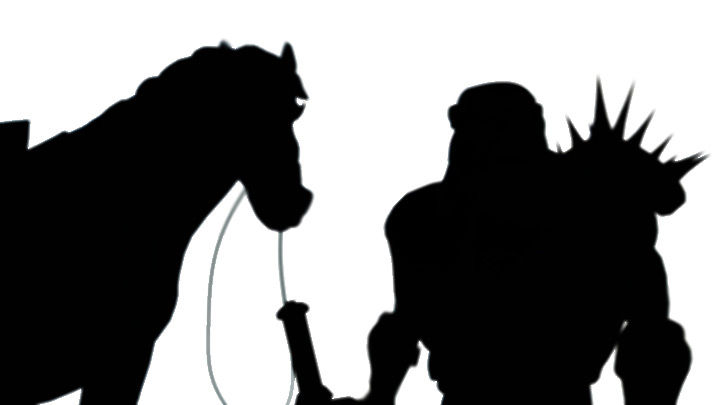
While developing the story, I worked together with Michael Sieber and Klaus Morschhaus on the characters: Tarragon our hero, Otis, the dragon baby, Bullie, the battle horse and the dragon mother.
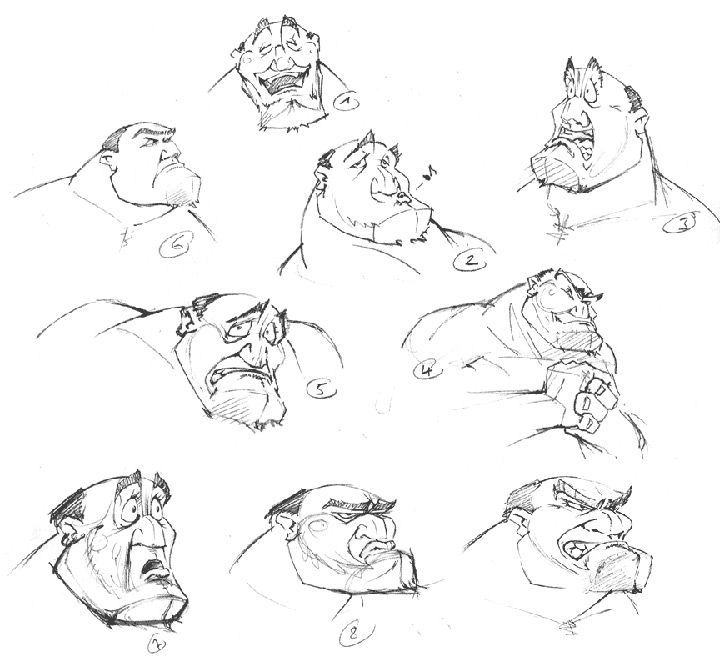
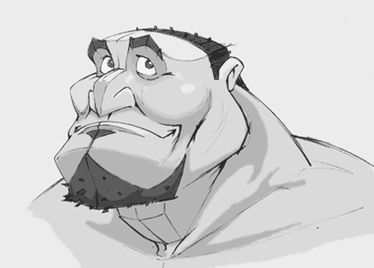
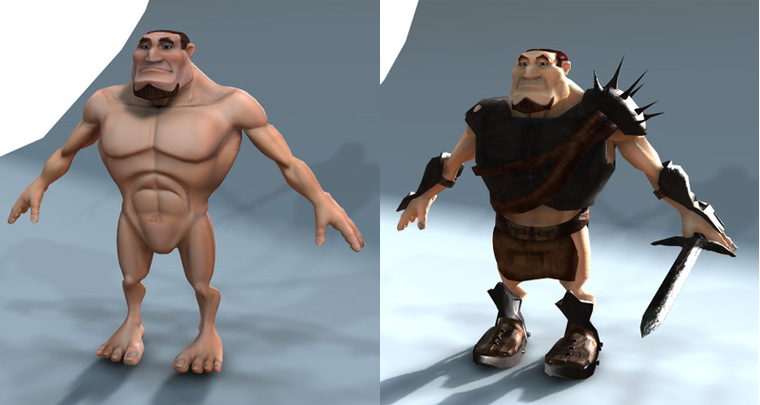
First we needed some tests to find the final characters. The first designs of the hero were too friendly and too lanky. But then after some more designs we were satisfied. The dragon slayer had to be a killing machine who had been doing his job for many years with a good heart inside but never thinking too much about what he was doing. It was much more difficult to find the design of the dragon’s baby. We did a lot of tests and it took us some time until we were happy with the result – a little baby dragon that looked so cute you never would be able to kill him.
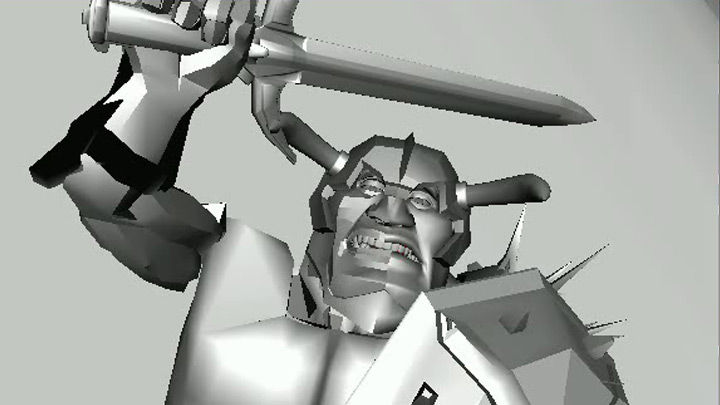
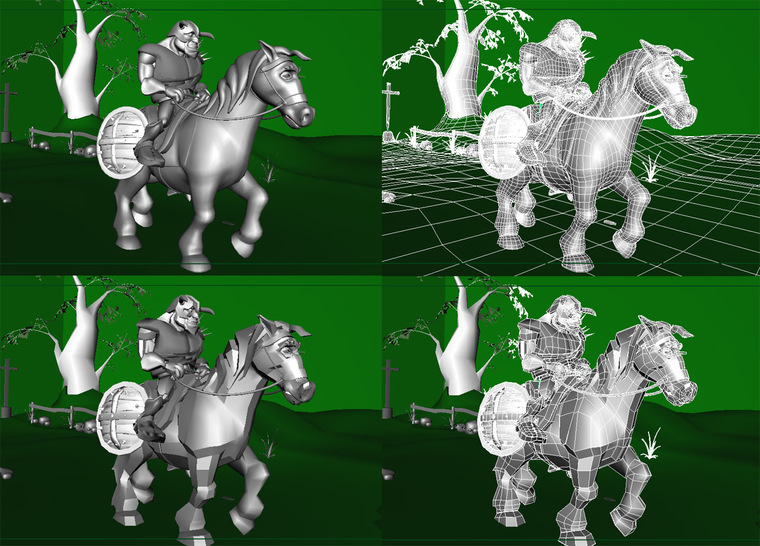
Taragon
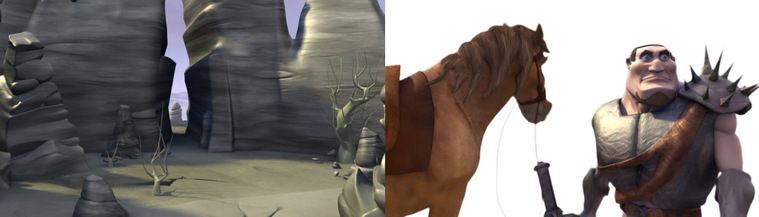
Taragon is an experienced Dragen slayer, about 40 years old and kills dragons for money. No one knows how it started. Was it greed or hatered? Nobody knows why. But one thing is for sure, he is just doing his job. He never considered the idea of changing something in his life. He never thought about what consiquences it might have, him killing a dragon, maybe a dragon mother.Lonely and without fullfilment in his beeing he is riding from one commission to the next.For some Taragon is a hero, a shining hero who is saving them from all evil. But for him its all nothing but tedious work.
Bullie
Bullie is an old fighting horse, who knows a lot about life and how to behave. Most of the time he knows much more than our hero. But Taragon has to find out by himself.
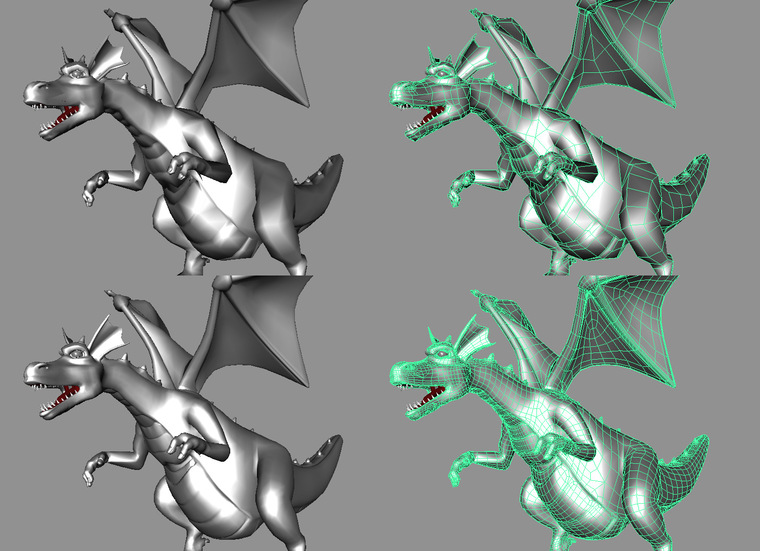
Otis
Otis the baby dragon, hasnt seen much bad things in life yet. That is the reason why he isn`t afraid of Taragon. Even as Otis sits besides his dead mother, he doesnt realize what is going on.
Mother Dragon
The mother dragon may look terrifying, but in her heart she’s just a care taking mother who looks after her children. How ever, people are afraid of dragons, they don’t realise that the mother dragon only wants to protect her children like anyone of us would do.
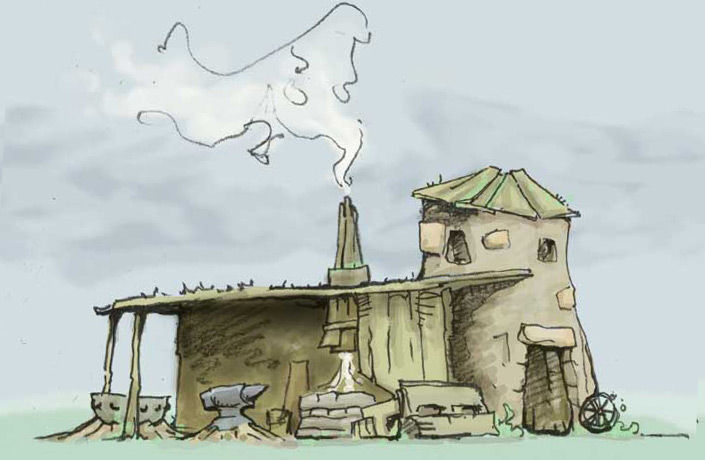
The Blacksmith
The Blacksmith is pleased with his life. He has a fulfilling job and a son he loves. He knows about the importance of the dragon slayer and his job he is doing for the community.
The Blacksmith’s son
The Blacksmith’s son admires Taragon. For him he is a hero, who lives an adventures and brave life. But the one he looks up to the most is his father.
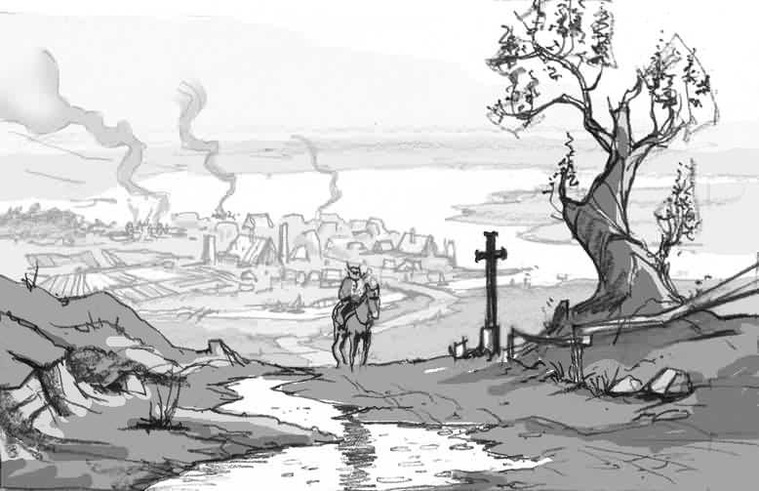
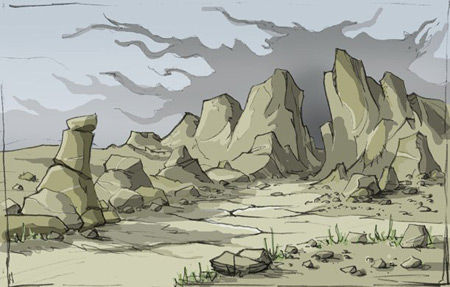
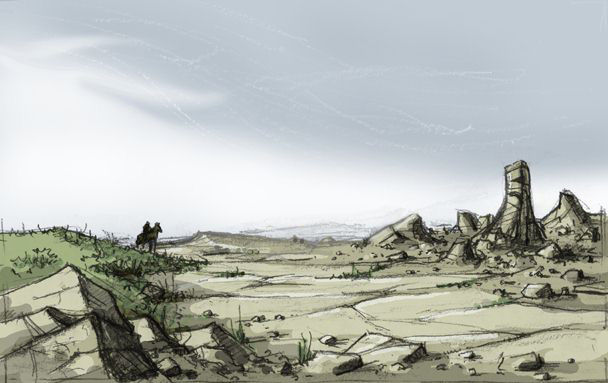
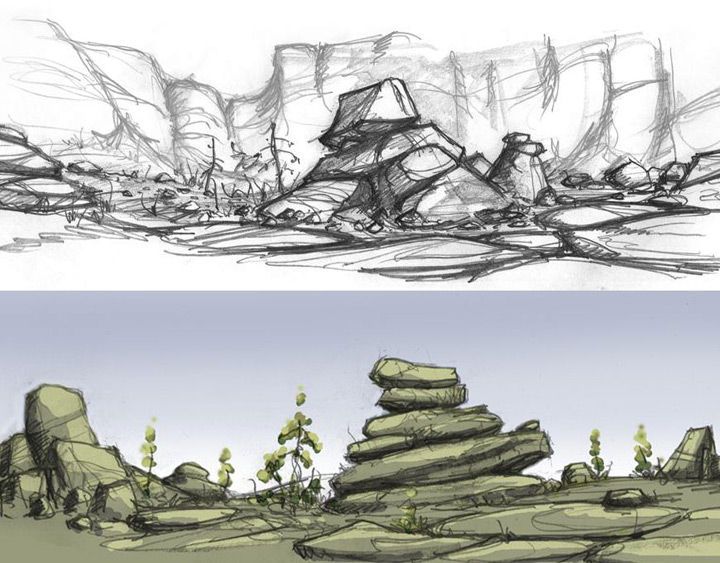
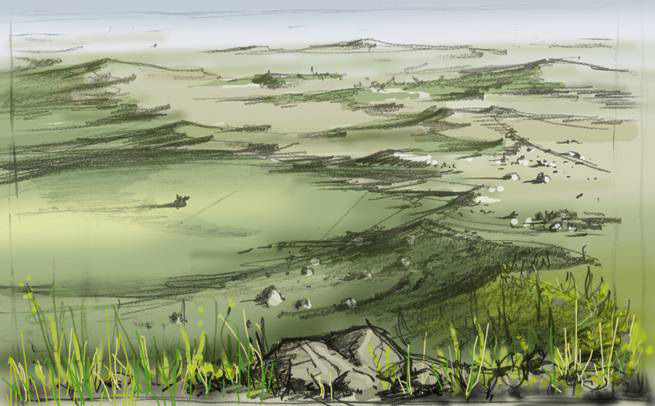
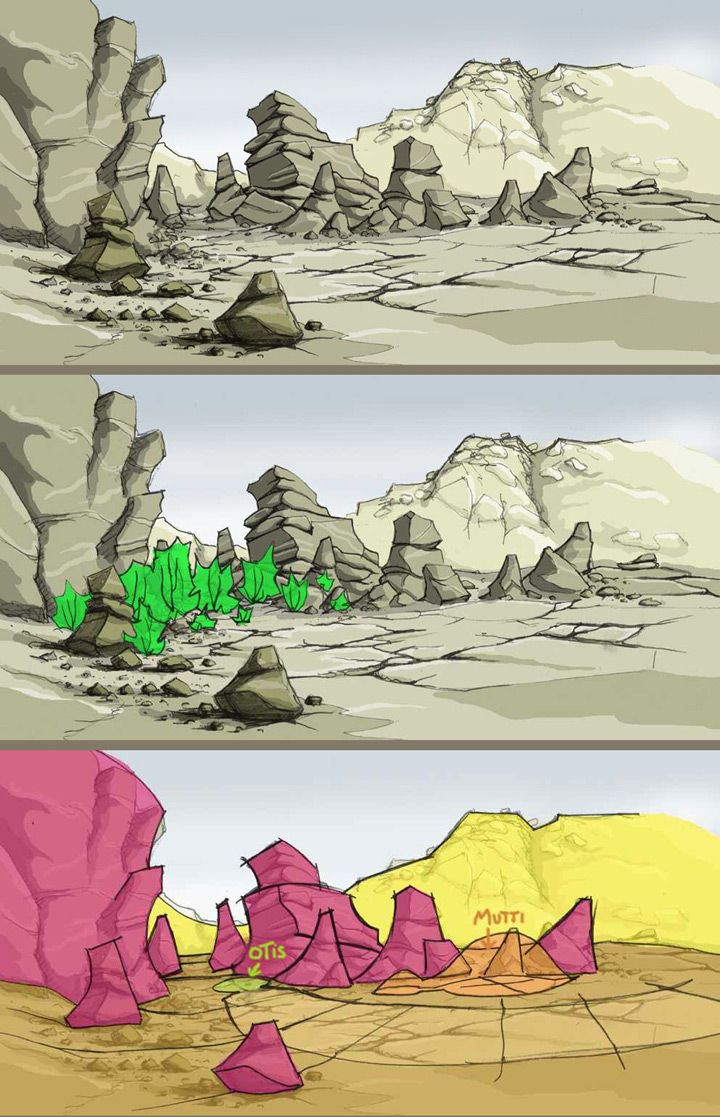
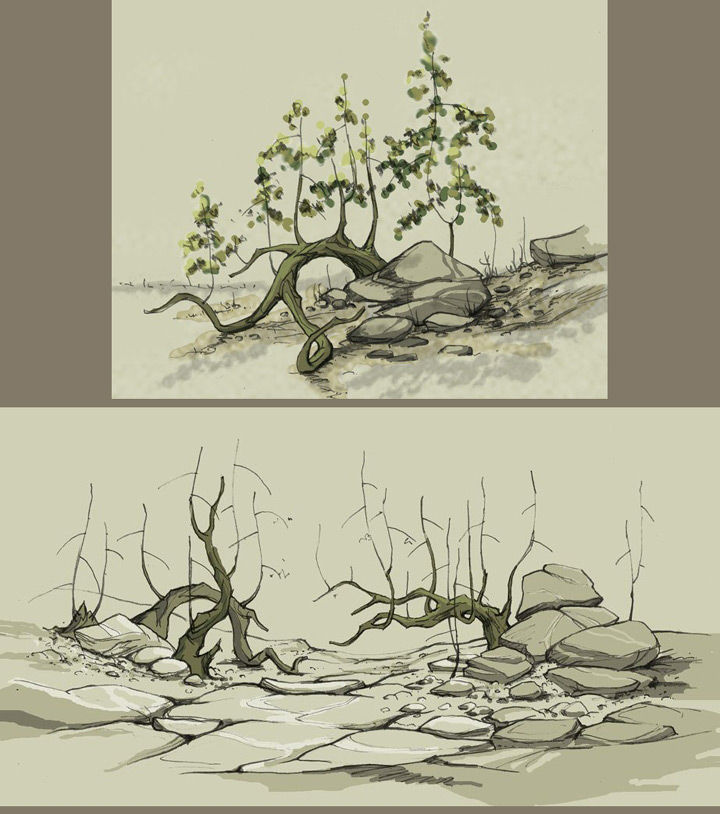
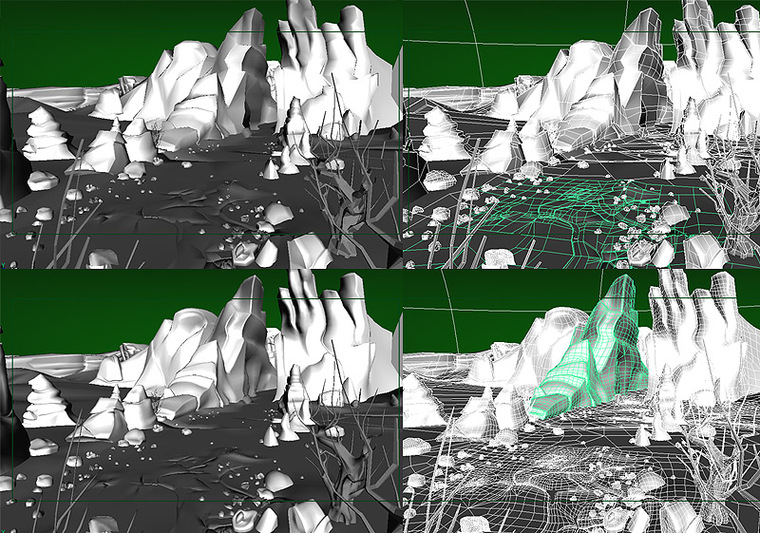
Environment Designs
Character Modeling
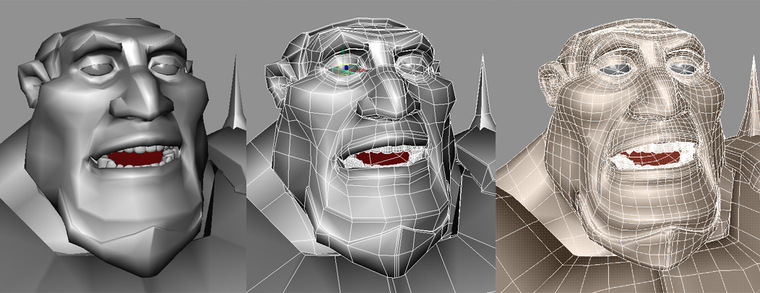
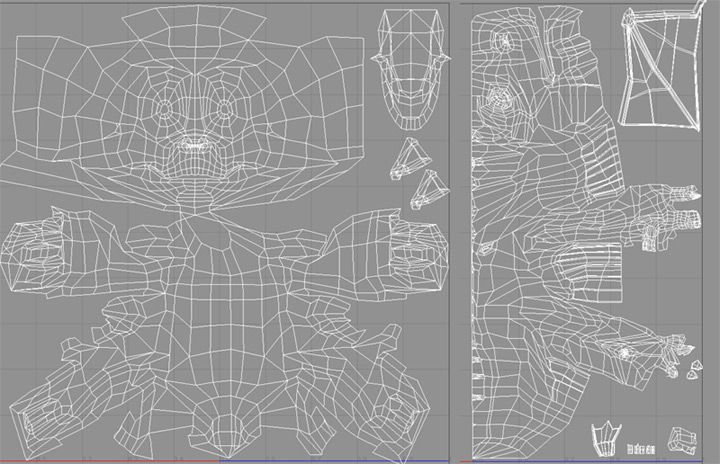
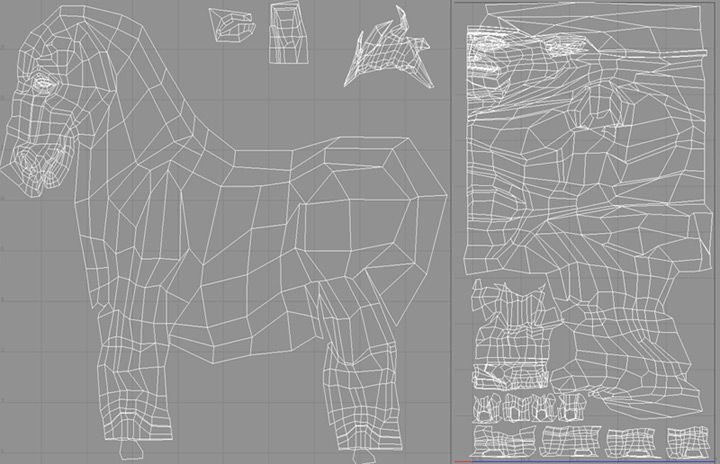
All objects in the movie are modeled out of polygons. The reason for that is very simple. Polygon objects are much more flexible than nurbs objects. And subdivision surfaces don’t work as they should in Maya.
The polygon objects were created using the box modeling technique. You begin with a very low poly object, such as a box and you put more and more details into the object by extruding and splitting polygons. I mainly used the Extrude Polygon and Split Polygon tools.
The final result is always a low polygon character that has as many polygons as you need in order to show the needed details. At the end, you smooth the character and get a high poly object. For animating, you use the low-poly object and for rendering you smooth the character. I used Mel scripts to simplify that process.
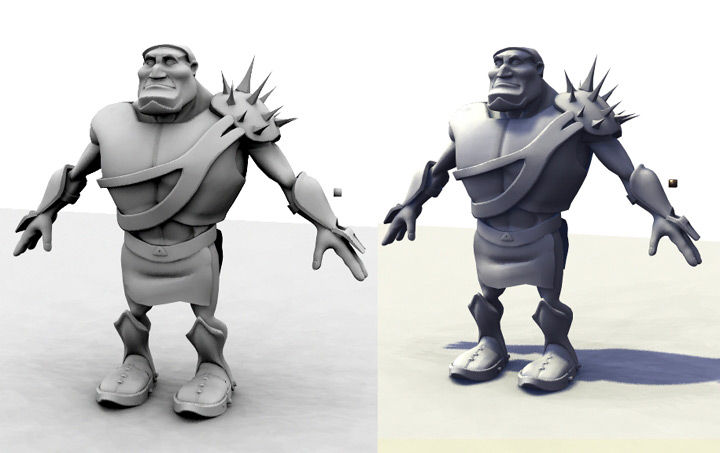
Every character has a low resolution poly version, which is used for animating and a high resolution poly model which is used for rendering the final images. The high resolution poly version is the result of smoothing the low poly version
The basic model is a low poly model. The higher resolution model is the result of a smoothing operation.
Blend Shape modeling, about 40 blend shapes for the hero.
In addition to the blend shapes, stretch and a squash deformers are used to achieve non symmetrical and cartoon animation.
To correct binding problems correction Blend shapes were applied to parts like bizeps, shoulder, neck etc.
All blendshapes can be mixed with one another

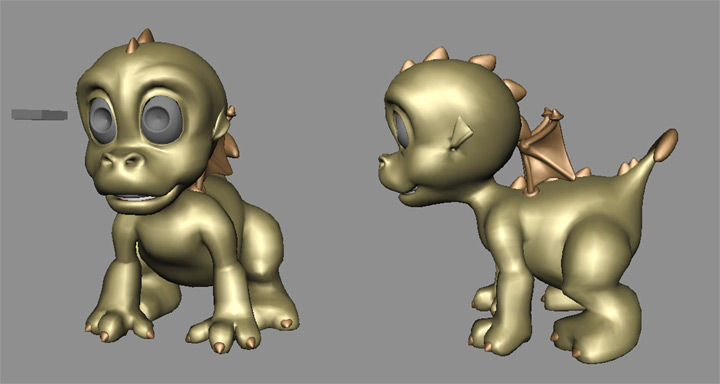
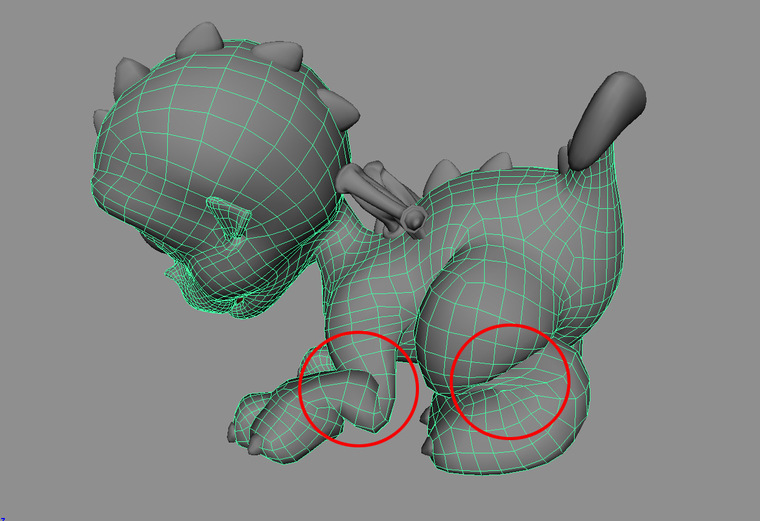
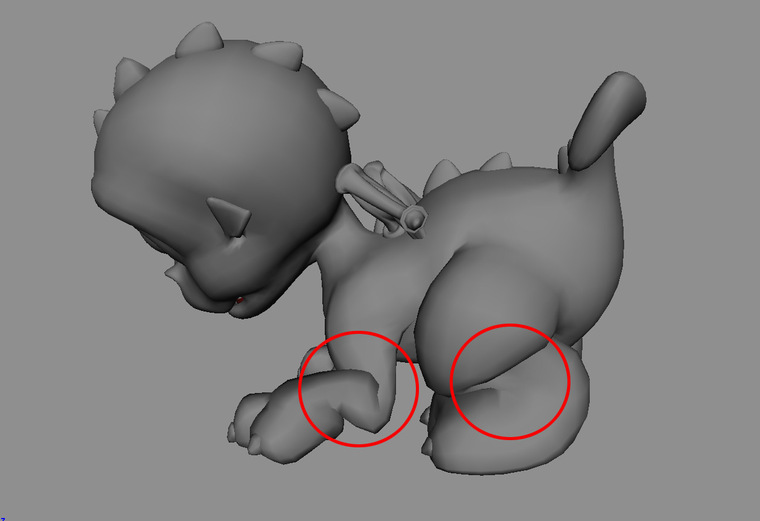
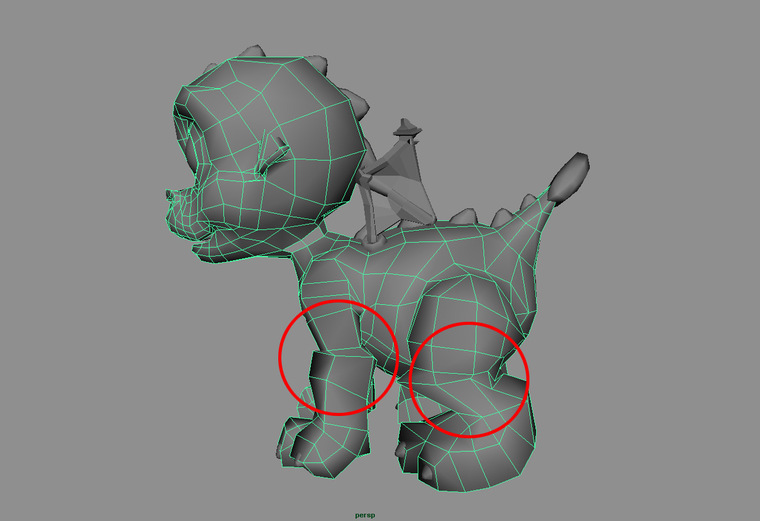
When I was modeling the baby dragon I made a mistake. I didn’t put enough polygons into his wrinkle. So there were some bad looking deformations. But when I found it out, it was to late, so I just had to live with it.
Problems resulting from bad modelling. Otis is a good example for that. Not enough polygons were created around the joints where a lot of deformation takes place.

The environment is made of polygons. The sky is a nurbs surface.
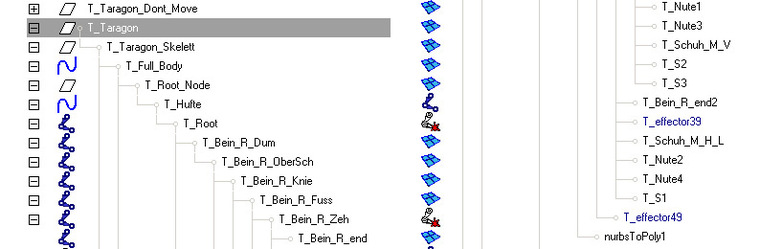
Rigging
I spent a lot of time making the rig, because I find it important to have a very simple and intuitive interface to animate with. As a sample, I used the rig from Jason Schleifer on which I did some modifications. First I killed the stretch function from the extremities because it was not usable for my kind of animation. Instead of that I put a stretch and squash function onto the head. I used the nonlinear deformer squash and bend.
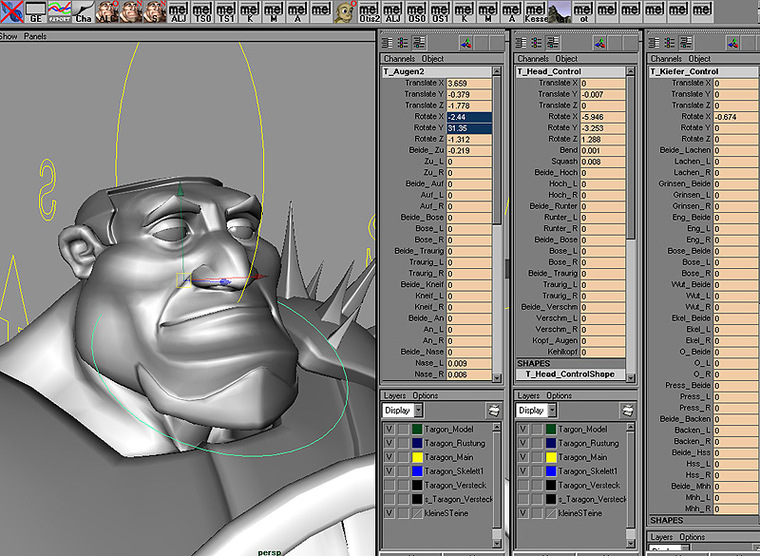
To simplify the interface I put the blend shapes of the eyes, mouth and eye brows onto the controller of the rig, in order to pick them very fast. Additionally, I put attributes on to the controllers in order to drive the left and right face parts separately by connecting the blend shapes with the driven keys. So I had a very intuitive interface and my workflow was very fast.
The blend shape editor in Maya was not particularly useful for me, because the interface is not so good. The idea of putting all controllers, IKs, clusters onto one layer in order to fade them out is very good though. This made it possible to put everything that was not useful in the animation interface aside. Also the colored controllers made it possible to have a better overview in the animation. Another tool I used was the jiggle. I used it to get some more natural behavior for some body parts. It was especially useful for the horse hairs and the reins.
Rig of Taragon
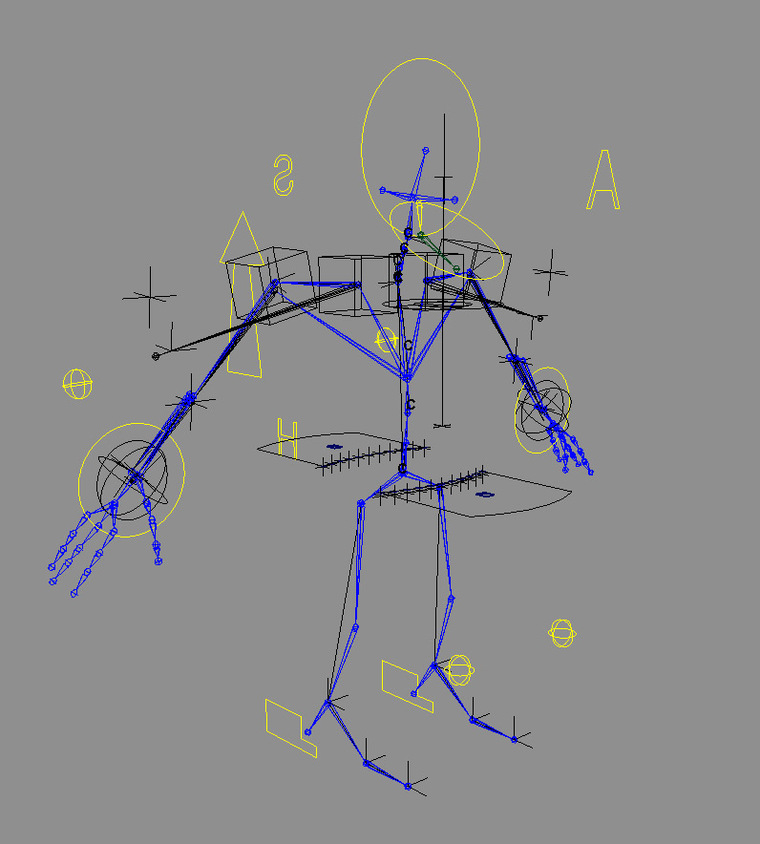
Each rig includes over 400 nodes.
In order to achieve a good overview over the different parts like IKs, clusters etc. used in the rig, I worked with layers to make it easier to hide not needed groups. To obtain a good pick mask I colored the left,right and middle handles
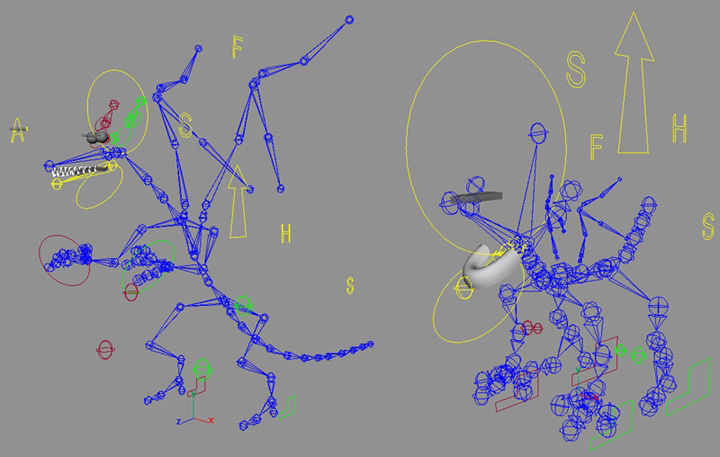
All animation controls were put onto selection handles. This made the interface fast and intuitive to use
.
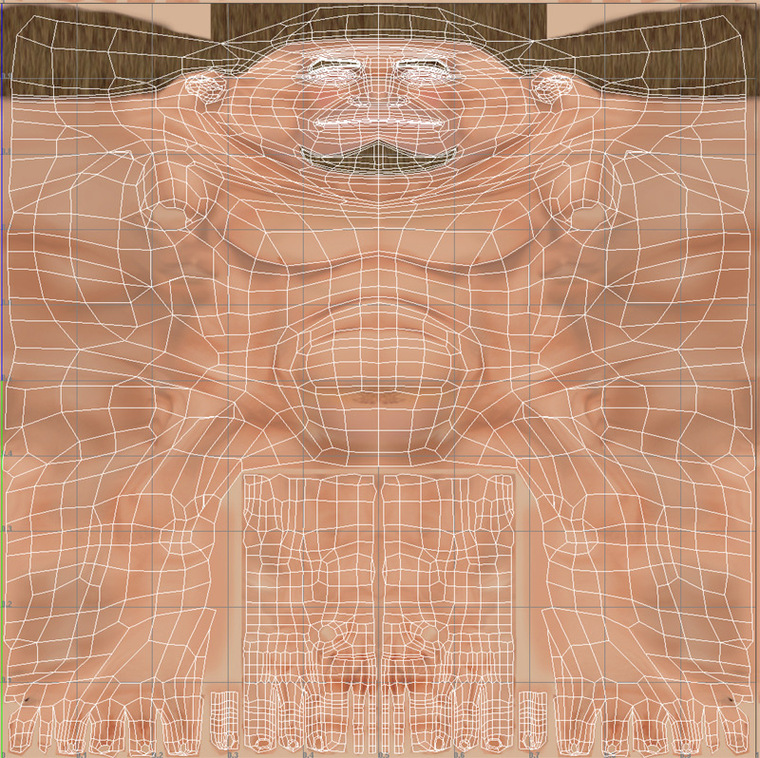
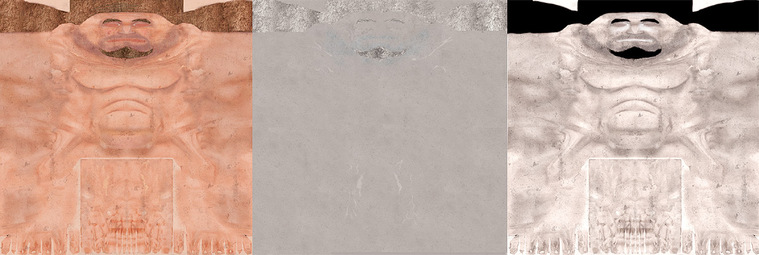
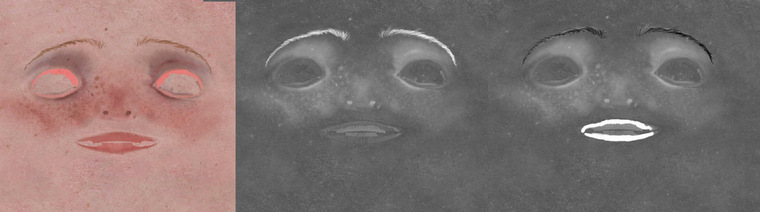
Texturing
All characters have been UV-unwrapped. The result was a tiger-like unwrapped skin. It was very important that every polygon had its own pixels in the UV editor. Otherwise you had some bad deformations in the texture.
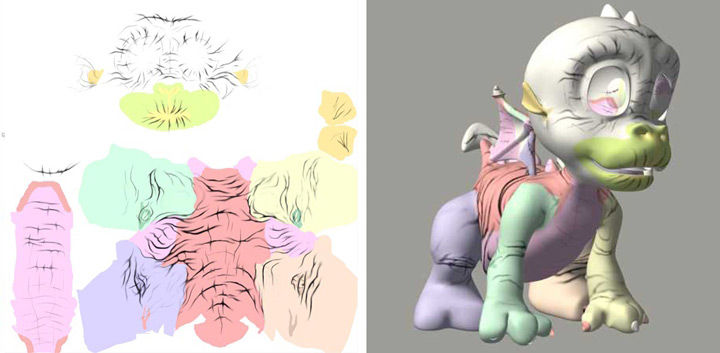
The texture was then projected on to the characters and I converted to solid textures in order to paint over the textures in Photoshop again. In the end I had a UV-based pixel map to work with.
My first approach texturing the characters I used projection maps. In order to avoid floating textures while moving the character I used texture referenced objects. But this technique slowed down the rendering process. So I decided to work with uv based texturing.
You can get a very high detailed look in the rendered images but the render time time get very high, because of the amount of texture you need make one character working It is more difficult to handle projected textures. Because if you use different images from different angles projected onto one object you need some very good masks to fit the images. And you need a Reference Objekt, which can cause some problems.
Animation
The entire movie took me 4 months to animate. The workflow I used was like this: I posed and blocked the characters already in the animation, so I could use the blocks later to start my animation. After this, I put more and more details into the animation.
It was very useful to wait some days before working at the animation again so I would have a new view for the shot and could improve the animation with a fresh eye.
The animation process is pose to pose. So you can assure in a very fast way that the shot works. You also can check on the timing this way. If the poses are final I begin to animate forward. I start with the body (Hip) move on to the feet, arms and the head, then hands&
The first main poses are done for the animatic. If the animatic works with those poses I move on. I really like to keep some time, maybe a day before finishing one shot. And so I polish the animation until it is final.
In general the rig worked fine, but for the next rig I would like to do some modifications. Additionally FK for the arms and FK for the upper body.
Visual Effects
For additionl effects like rain, dust, fire we used the particle system of Maya and 3ds Max. The dust was done in the compositing by using real footage layering over the images.
For the rain we used a particle tool in Maya written by Mathias Zeller. A simple interface, so you don’t have to take care technique behind it.
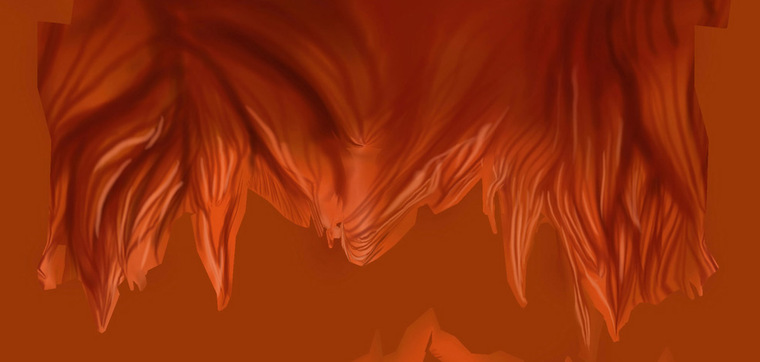
The fire effects were done in 3dsMax. We tried to achieve a special look, something between realistic fire and comic fire. After that the fire was composed in Combustion.
We also used Maya cloth for the loincloth of Taragon. It was simulated after his animation was final
Rendering
I used the standard Maya renderer. The first tests with mental ray and global illumination didn’t work well, because the rendering time was much too high, even though I used a renderfarm with more than 50 processors. The render time was much too high, so I faked the global illumination look using a light dome with directional lights. These directionals have pixel map shadow with 1024 resolution and blur 3.
It was very important that the shadows blurred into each other because I wanted to have a diffuse shadow with soft light. The main light (sun light) had a raytraced shadow which was always sharp and there was no flickering. This main light was yellow and the soft directional lights were blue.
The renderfarm we used had about 50 CPUs, each with 2000 GHz. To distribute the jobs onto the CPUs I used the rendertool Royalrender.
What software/hardware did I use?
3D Software: Maya 4.5, Maya Cloth
Compositing: Combustion 2.0
Color Grading: Avid Symphony
Music: Pro Tools
Other Software Premiere, Photoshop
At the beginning we tried to render in 3ds max (Vray) and Lightwave, because these renderers are famous their high quality, without having to adjust a lot of parameters. Maya’s software renderer often has problems with antialiasing, depth of field, and has no build in GI-renderer. We tried both Max and Lightwave. The main problem was the translation of the Maya files to Max and Lightwave format without losing any data.
Lightwave
We tried the Beaver Project, and it worked fine. The motion-file containing the deformed objects on a per frame basis, were imported into Lightwave. But unfortunately our Lightwave artist didn’t have enough time for the whole preparation process, which included assigning the textures an lighting the scenes.
3ds Max
We tested a freeware tool that exported the deformed objects on a per frame basis as OBJ Files. We imported them into 3ds max as morph targets. During the import process 3ds max assigned vertices numeration in an unpredictable way, so already prepared morph targets in 3ds max didn’t work anymore.
Mental Ray in Maya
We also tried mental ray with its GI-feature in order to produce a realistic behaviour of light. We used Mental Ray 1.5 Beta Plugin for Maya. One of the problems was Mental ray needed very high quality settings in order avoid flickering shadows. Render time was much to long and the plugin was very unstable. So we stopped using Mental Ray.
Finally we rendered with „GI Joe Dome Light“ using the standard Maya software renderer. The light dome was built of 80 directionals lights with soft shadows. We used them as ambient lights with a blue color. To simulate sunlight, we installed a directional yellow light with a sharp shadow. To ensure that the sunlight shadow was sharp we used a raytrace shadow on this.
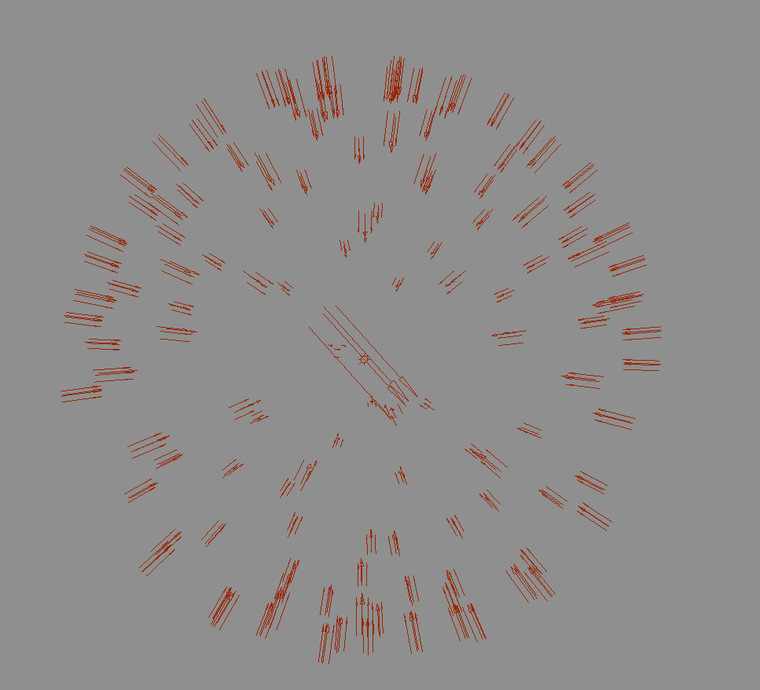
The light setup was divided in an upper and lower section. The upper section was used as primary light source casting depth map shadows. The lower section did not cast any shadows but brightened the scene.

Postproduction
Compositing
The compositing was done with combustion. For most shots we used 3 layers. Background layer, character layer and foreground layer. For some effects shots we used up to 20 layers.
The reasons for working in different layers are:
a) modifying the images is more easy, more control, color correction.
b) saves render time
For shots where the camera does not move you only need to render one background image.
Background / Character Layer
Foreground / Depth Mask / Alpha mask
Color Correction Avid Symphonie
We used the Avid Symphonie to make some final color corrections. The original images were very yellow and green, so we added some red and blue.
Music
The film music was composed by a student, Julian Pesek, and brought in by the Ludwigsburger Orchestra. Additionally, the musician composed a song for the credits with a singer. After the music was finalized we decided to shorten the film by about 1 minute. This was a small problem, because now we had to fit the music to the new cut, but in the end it worked out.
Parallel to the music, Frank Casaretto did the sound design. Both musicians worked on the final cut, while we did the compositing.
Conclusion
What sorts of challenges did I face when making the short film?
The challenges started from day one, where the main problem of the story was to show a convincing change of the hero’s character in a short movie. Mostly if you tell a short film the story is simple or you just try to tell a joke. The characters don’t really change or grow much. You just have to try to have one strong turn at the end of the story. Not so in my case. I tried to imitate the structure of a full feature film and bring it to a short film, including portraying depth of character, his needs and wants, his background and so on. In my short film you know from the middle of the film how the movie will end, but you have to see it and to feel it. When I watch films in the cinema, very often I know how the film will end, so that is not the point. What I think is important is that you believe the characters and feel with them, or – even better – identify with them.
So the main challenge was to give that much background information and make sure that everyone understood the character’s needs. We created the situation at the beginning when the dragon slayer was meeting the blacksmith and his son. At this point I was a little afraid nobody would understand that the dragon slayer already had this need somewhere in his head, but didn’t realize it.
In this short introduction I could show a lot of stuff. For example, his dissatisfaction with his situation. You can see it how he is riding on his horse unambitiously, and the view of the people towards him shows a lot of his situation. The people only see the heroic side of his work. They admire him and give him a lot of respect; he is something of a star. But we see his real life; it is boring and unfulfilling.
To make his character deeper we created the introduction sequences at the beginning and at the end. We could show much more of his background and understand his decision at the end by making this short review of what happened and what will happen. These snapshots of Tarragon are ironic, especially at the beginning of the movie where what we see is not what we get. The picture shows a shining hero, but what we see at first in 3D images is the opposite.
Then there were various technical issues. I had some anti-aliasing problems using Maya’s depth of field. So we had to fix this in the compositing using additional masks. Then, for some shots I had to break the scenes into different layers, because Maya wouldn’t render the scenes. They were just too big.
At some point after we had recorded the music by an orchestra, the movie was shortened. So it was much more difficult to fit the music to the new length of the movie. Thanks to our musician though, who did an excellent job using the music program to cut everything together. Finally, nobody realized that it wasn’t meant to be like this. He also created new music synthetically and mixed it with real sounds.
If you take care of a project on your own, sometimes decisions are difficult to make. I experienced this and realized it was better for the project if I discussed the problems of project with people from the team. At the same time, it was also very exhausting to find new people for the project again and again, especially because there was no money for the project. I had to finish the movie by a specific date, but I still had to earn some money meanwhile, in order to have enough money to live. So I also had some time issues too.
If I could have done anything differently, what would it have been?
I would work together with a script writer right from the beginning of the project in order to make the development time as short as possible. I would work with 2D Storyboards from the beginning to save some time, instead of doing the 3D animation straight away. I would also try to find a permanent team of 2-3 people to help me over the whole production period. The best case would be if they each could be helping me in specialized fields.